
Guide Guide for getting DRM content. (WIP)
- Thread starter Applejuice
- Start date
-
Hi all, there are some hacked accounts posting viruses within zip links on gofile.
Please report these posts when you see them.
DO NOT reply to them, this just makes it harder for us to clean up and may get your account banned by mistake.

You are using an out of date browser. It may not display this or other websites correctly.
You should upgrade or use an alternative browser.
You should upgrade or use an alternative browser.

You should be able to yes, if you want any pointers/help you can message me.
I have the first problem you had. The text file is busy. You said you fixed it by wiping the devices data? How do I do this? Thanks
Restart PC first, see if that fixes it
- Mar 11, 2022
- 977
- 76,670
- 2,237
- Applejuice thank you brother, a very detailed instruction in which you do not need to think about anything, but just take it and do it. There were a couple of snags, it was necessary to enable virtualization via bios, otherwise android studio did not install android-emulator-hypervisor-driver. But this is how I understood it because I have an AMD processor and not an Intel. - And it was not immediately clear that the keys needed to be renamed to "device_client_id_blob" and "device_private_key" - If you add information that the keys should be renamed to your article (guide), then you will probably save someone a lot of time. - In general, thank you so much, so much for such a detailed guide!
Last edited:
- Mar 11, 2022
- 977
- 76,670
- 2,237
- sim0n00ps brother, thank you so much for the script! It works perfectly. The only thing I didn't immediately understand is that the keys need to be renamed. Then I just saw that the names of the keys are different. - Thanks for the script! Your script is perfect, thank you for your efforts!
Last edited:
- Mar 11, 2022
- 857
- 112,651
- 2,518
I will make a separate post for it and link it in the first post as that post has reached the limit for the amount of words

- Mar 11, 2022
- 977
- 76,670
- 2,237
- Just ask the moderators to add this information at the end of the post, they have no restrictions, they will easily add any text that you write, so it will be easier to perceive the information.
- Mar 11, 2022
- 857
- 112,651
- 2,518
(Part of a common error, ignore this post if you don't have trouble with getting Android Studio to run.)
Enable Virtualisation
Step 1: Get in your BIOS
For Windows the easiest way would be:- Click Start and then select Settings.
- Click Update & Security.
- On the left side, click Recovery.
- Under Advanced start-up, click Restart Now.
- Click Troubleshoot.
- Click Advanced options.
- Select UEFI Firmware Settings.
- Mar 11, 2022
- 857
- 112,651
- 2,518
Guide for MacOS users
Installing Python, Frida and Frida-tools
Download Python from this site: and get the latest version*. (Not the pre-release one)
* The latest version of time of writing is 3.12.0
Open the installer package and continue till the installation type.
Make sure all the options are enabled.
Verify the install by opening Terminal and type the following:
and
Go ahead and install Frida by typing the following in your Terminal:
Make sure to note somewhere what version got installed which is important later on. * (Version is marked in yellow)
* Versions can be different for you so double check.
Next up install frida-tools by typing the following in your Terminal:
Android Studio
Download Android Studio
Select the one for your Mac:
After downloading the DMG file simply open it up and drag and drop the app in the folder.
Next up open Android Studio by going in your application folder and opening the app.
You can leave most settings on default. Then when it comes to the licenses click accept on all of them till the finish button gets highlighted.

Then select "phone and tablet" with an "empty activity" and click on next, like shown in the image below:

Next up select a minimum SDK of Android 9.0 (Pie) or above like shown below:

Installing Frida-server on your virtual phone
Next up is to install frida on your virtual phone. Download frida on your PC from here: and search for "frida-server" with the right version that was highlighted in yellow when you installed frida using pip, and make sure to pick the android-x86 version, like shown below:Extract the file and drop it in the following location:
This folder is hidden by default. Here are a few ways to find it:
Next up open a terminal in the platform-tools folder. There are a few ways to do this:
- In the folder, press ALT (option) + CMD + P to show the path bar at the bottom, then CRTL click on platform-tools and press "New Terminal at Folder"
- Open a fresh Terminal and type the following: cd ~/Library/Android/sdk/platform-tools
You should see your devices like shown below:
Continue by typing the following command, make sure to check what version you currently need to use:
After it has been "inserted" on your phone type the following command to acces the phone (Take a look at the example images if you find this part hard.):
Example:
KEEP THIS TERMINAL OPEN!
Dumper Script
Head over to the following github on your PC (Not your virtual phone) and press the green "Code "button and then "Download zip".
Extract the zip file wherever you want. (I have it still in downloads folder) head into the dumper-main folder and open up the requirements.txt file using textedit.
Add the following line to the file:
It should look something like this now:
Save the file and open a new Terminal in the dumper-main folder. (While still having the previous one open.)
In the second terminal or powershell type:
Once it is done installing the needed packages type the following:
KEEP THIS TERMINAL OPEN!
Getting keys using the Dumper script
Finally use your virtual phone and navigate using chrome to the following site:
The site will ask if it is allowed to play protected videos. Press ALLOW.
Scroll a bit down till you see the video and press play.
You should see some activity in your second terminal or powershell. That means it has worked! 🎉
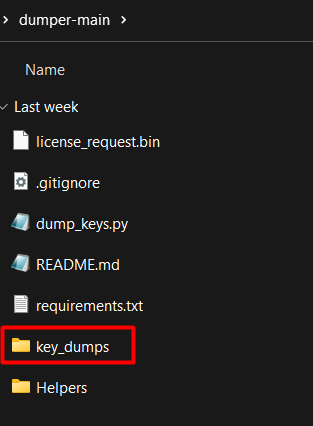
To verify that, head into the dumper-main folder and check if you see the "key_dumps" folder:
When heading further into the folders you'll find "private_keys" keep going into that folder till you see these two files:
Rename these files accordingly:
| Original name | New name |
| client_id.bin | device_client_id_blob |
| private_key.pem | device_private_key |
Make sure to change the extension, this should happen when you rename the files.
Check to see if the file type has changed to just "Document" instead of a BIN or PEM file.*
*Note that this is a comparison, you will only have the two files (device_client_id_blob and device_private_key)
You are now ready to use the keys for the scraping tools.
(I still want to make a guide to a few of those scrapers, with again the intention of making it simple to understand and follow.)
In the meantime you can try it yourself by following the already existing guides from here:
https://simpcity.su/threads/onlyfans-downloading-a-complete-guide-for-pc-and-mobile.10208/
I'm trying to download a video that was sent to my messages on onlyfans. Tried the "righclick" extension in Chrome but it's greyed out. Is there an easier way of getting it?
- Mar 11, 2022
- 857
- 112,651
- 2,518
Use one of the DRM supported methods linked here: https://simpcity.su/threads/onlyfans-downloading-a-complete-guide-for-pc-and-mobile.10208/
Jesus lol They don't make it easy
any help? sim0n00ps onlyfans downloder is crashing it shows eveyrhting if found than crashes.
the log file -
2023-12-01 15:52:58.912 +05:30 [ERR] Exception caught: A connection attempt failed because the connected party did not properly respond after a period of time, or established connection failed because connected host has failed to respond. (raw.githubusercontent.com:443)
StackTrace: at System.Net.Http.HttpConnectionPool.ConnectToTcpHostAsync(String host, Int32 port, HttpRequestMessage initialRequest, Boolean async, CancellationToken cancellationToken)
at System.Net.Http.HttpConnectionPool.ConnectAsync(HttpRequestMessage request, Boolean async, CancellationToken cancellationToken)
at System.Net.Http.HttpConnectionPool.CreateHttp11ConnectionAsync(HttpRequestMessage request, Boolean async, CancellationToken cancellationToken)
at System.Net.Http.HttpConnectionPool.AddHttp11ConnectionAsync(QueueItem queueItem)
at System.Threading.Tasks.TaskCompletionSourceWithCancellation`1.WaitWithCancellation(CancellationToken cancellationToken)
at System.Threading.Tasks.TaskCompletionSourceWithCancellation`1.WaitWithCancellationAsync(Boolean async, CancellationToken cancellationToken)
at System.Net.Http.HttpConnectionPool.HttpConnectionWaiter`1.WaitForConnectionAsync(Boolean async, CancellationToken requestCancellationToken)
at System.Net.Http.HttpConnectionPool.SendWithVersionDetectionAndRetryAsync(HttpRequestMessage request, Boolean async, Boolean doRequestAuth, CancellationToken cancellationToken)
at System.Net.Http.HttpMessageHandlerStage.Send(HttpRequestMessage request, CancellationToken cancellationToken)
at System.Net.Http.DiagnosticsHandler.SendAsync(HttpRequestMessage request, Boolean async, CancellationToken cancellationToken)
at System.Net.Http.RedirectHandler.SendAsync(HttpRequestMessage request, Boolean async, CancellationToken cancellationToken)
at System.Net.Http.HttpMessageHandlerStage.Send(HttpRequestMessage request, CancellationToken cancellationToken)
at System.Net.Http.SocketsHttpHandler.Send(HttpRequestMessage request, CancellationToken cancellationToken)
at System.Net.Http.HttpClientHandler.Send(HttpRequestMessage request, CancellationToken cancellationToken)
at System.Net.Http.HttpMessageInvoker.Send(HttpRequestMessage request, CancellationToken cancellationToken)
at System.Net.Http.HttpClient.Send(HttpRequestMessage request, HttpCompletionOption completionOption, CancellationToken cancellationToken)
at OF_DL.Helpers.APIHelper.GetDynamicHeaders(String path, String queryParams, Auth auth)
at OF_DL.Helpers.APIHelper.BuildHttpRequestMessage(Dictionary`2 getParams, String endpoint, Auth auth)
at OF_DL.Helpers.APIHelper.GetUserInfo(String endpoint, Auth auth)
2023-12-01 15:52:58.949 +05:30 [ERR] Inner Exception: A connection attempt failed because the connected party did not properly respond after a period of time, or established connection failed because connected host has failed to respond.
StackTrace: at System.Net.Sockets.Socket.AwaitableSocketAsyncEventArgs.ThrowException(SocketError error, CancellationToken cancellationToken)
at System.Net.Sockets.Socket.AwaitableSocketAsyncEventArgs.System.Threading.Tasks.Sources.IValueTaskSource.GetResult(Int16 token)
at System.Net.Sockets.Socket.<ConnectAsync>g__WaitForConnectWithCancellation|281_0(AwaitableSocketAsyncEventArgs saea, ValueTask connectTask, CancellationToken cancellationToken)
at System.Net.Http.HttpConnectionPool.ConnectToTcpHostAsync(String host, Int32 port, HttpRequestMessage initialRequest, Boolean async, CancellationToken cancellationToken)
2023-12-01 15:52:58.950 +05:30 [ERR] Exception caught: Object reference not set to an instance of an object.
StackTrace: at OF_DL.Program.Main()
I'm kinda new to all this. could someone DM and help me out with a dummies version of a step by step to download that content?
- Mar 11, 2022
- 1,040
- 39,533
- 1,902
can pictures for the guide be reuploaded? assuming it was on pixli or something
- Mar 11, 2022
- 857
- 112,651
- 2,518
Making another post because I hit the limit on words... (Even though I just replaced the images...)
For the automated methode you need to download two zip files, first head over to the following github on your PC and press the green "Code "button and then "Download zip".
Extract the zip file wherever you want. (I have it still in downloads folder) head into the folder and open up the requirements.txt file using notepad.
Add the following line to the file:
Save the file and close it.
You can open a terminal or powershell by either right clicking and selecting terminal/powershell (1) or by typing "CMD" in the path bar (2).
In the second terminal or powershell type:
Now download another zip from the following github: (Made by sim0n00ps ) by pressing the green "Code" button and then "Download zip".

Extract the zip file at your preferred location and you should see four files:
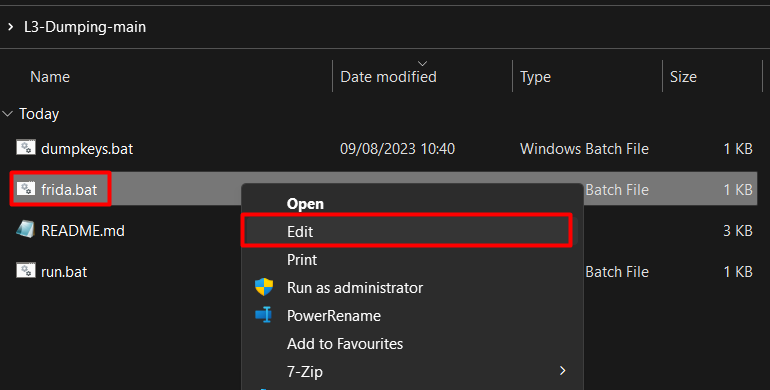
Right Click on "frida.bat" and press edit to open it in Notepad so you can add the needed path lines.
(Windows Defender may give a warning, but simply press "more info" and then "run anyways".)
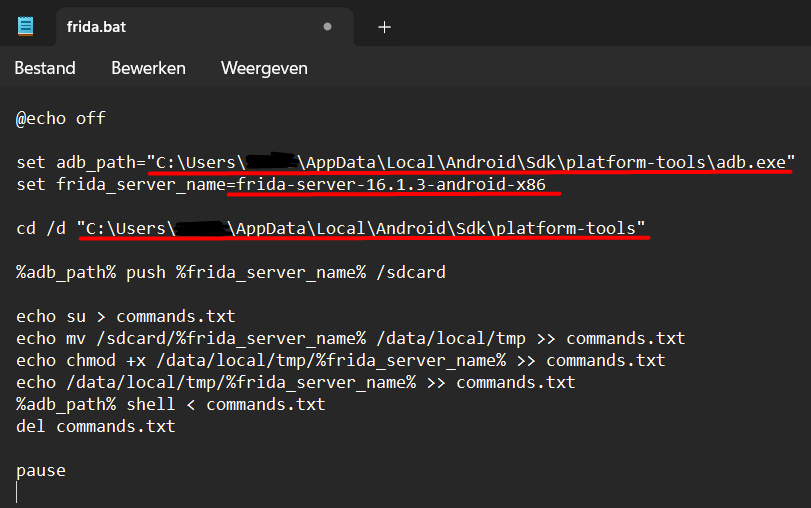
For the adb_path replace "YOUR PATH TO adb.exe HERE" with*:
For frida_server_name replace "YOUR FRIDA SERVER VERSION HERE" with*:
And finally for the frida.bat replace: "YOUR platform-tools PATH HERE" with*:
When that's done it should look something like this:
Save the file and exit.
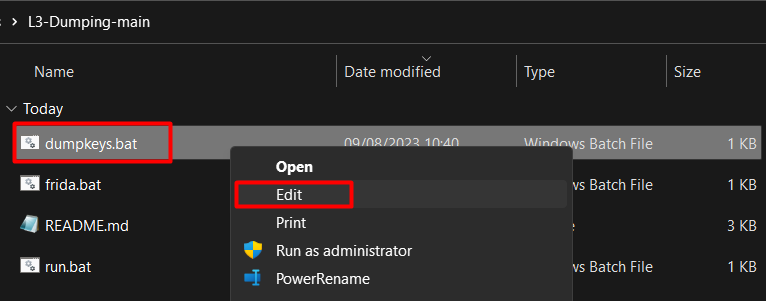
Next up open up the dumpkeys.bat.
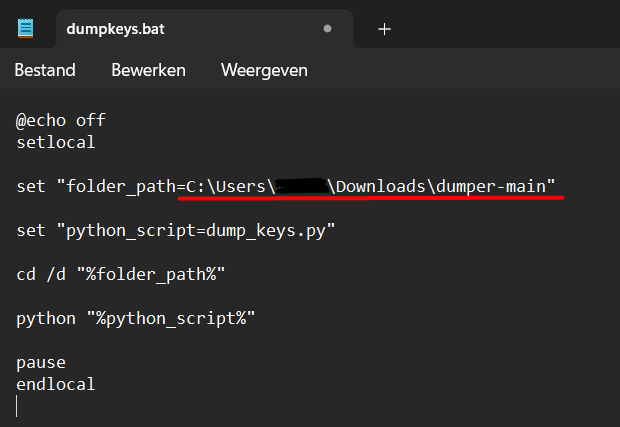
Replace "YOUR PATH HERE" with the path to your dumper_main folder. So depending on where you placed it the name may differ, but the easiest way to copy the location would be to Right Click on the dumper_main folder* and press "Copy as path"

*Make sure that the folder aims directly at the folder that has the requirements.txt and dump_keys.py in it.
It should look something like this:
Save and exit the file.
Now finally, make sure your device is running! Then double click on the "run.bat" file. Two commandlines will open up.
With your virtual phone, navigate using chrome to the following site:
The site will ask if it is allowed to play protected videos. Press ALLOW.
Scroll a bit down till you see the video and press play.
You should see some activity in one of the commandlines. That means it has worked! 🎉
To verify that, head into the dumper-main folder and check if you see the "key_dumps" folder:
When heading further into the folders you'll find "private_keys" keep going into that folder till you see these two files:
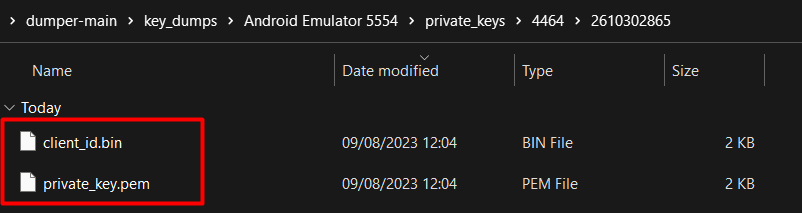
Unlike the manual method you do not have to change anything.
Automated version:
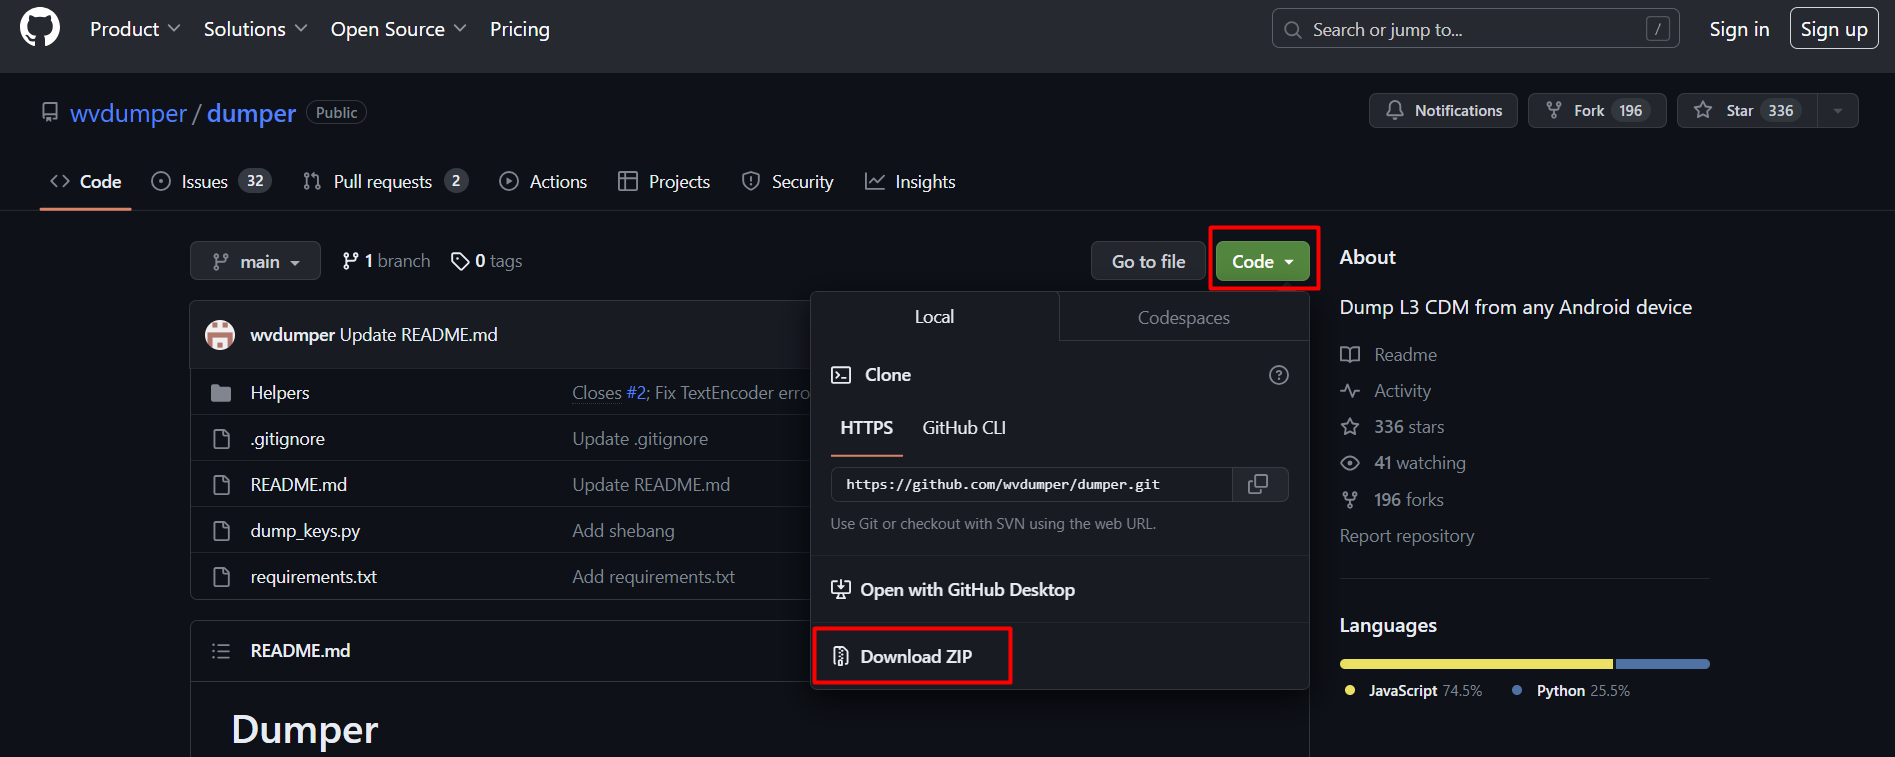
For the automated methode you need to download two zip files, first head over to the following github on your PC and press the green "Code "button and then "Download zip".
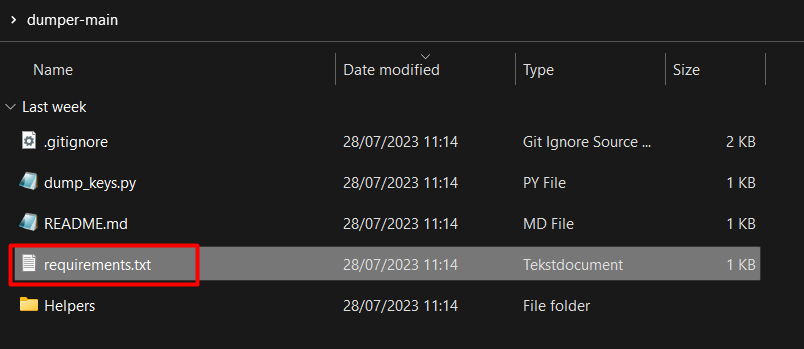
Extract the zip file wherever you want. (I have it still in downloads folder) head into the folder and open up the requirements.txt file using notepad.
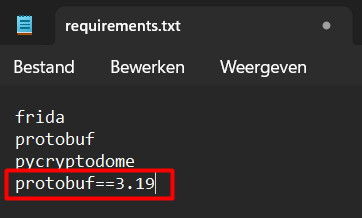
Add the following line to the file:
It should look something like this now:
Save the file and close it.
You can open a terminal or powershell by either right clicking and selecting terminal/powershell (1) or by typing "CMD" in the path bar (2).
Option 1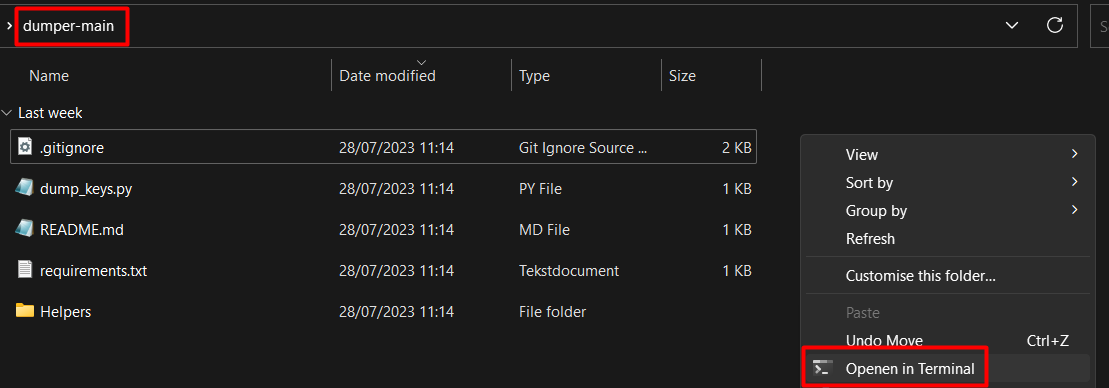
| Option 2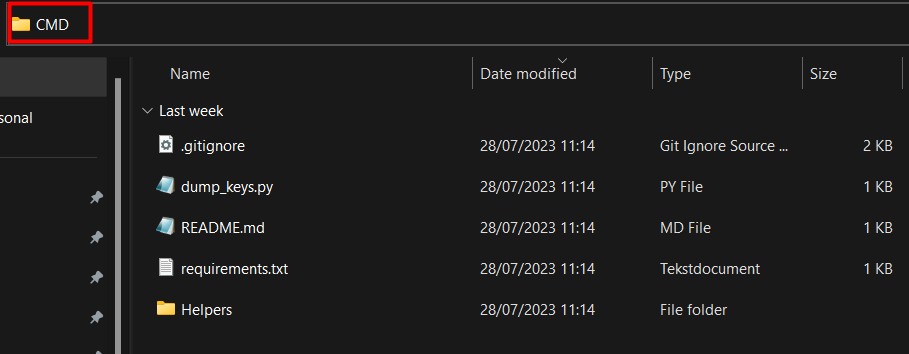
|
In the second terminal or powershell type:
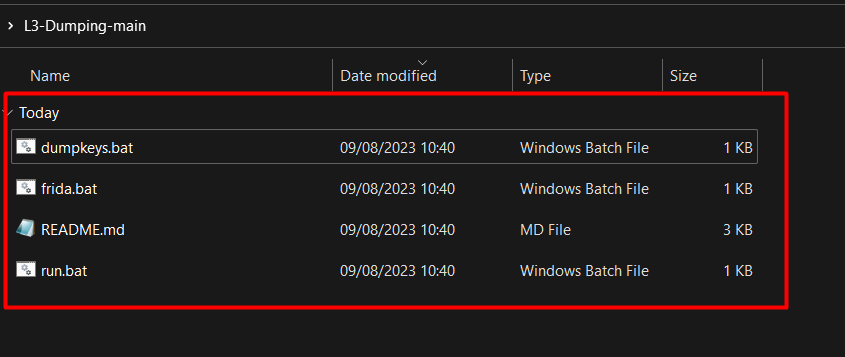
Now download another zip from the following github: (Made by sim0n00ps ) by pressing the green "Code" button and then "Download zip".
Extract the zip file at your preferred location and you should see four files:
Right Click on "frida.bat" and press edit to open it in Notepad so you can add the needed path lines.
(Windows Defender may give a warning, but simply press "more info" and then "run anyways".)
For the adb_path replace "YOUR PATH TO adb.exe HERE" with*:
*DON'T FORGOT TO CHANGE [your_name] with the current user.
For frida_server_name replace "YOUR FRIDA SERVER VERSION HERE" with*:
*CHECK WHAT VERSION YOU ARE RUNNING!
And finally for the frida.bat replace: "YOUR platform-tools PATH HERE" with*:
*DON'T FORGOT TO CHANGE [your_name] with the current user.
When that's done it should look something like this:
Save the file and exit.
Next up open up the dumpkeys.bat.
Replace "YOUR PATH HERE" with the path to your dumper_main folder. So depending on where you placed it the name may differ, but the easiest way to copy the location would be to Right Click on the dumper_main folder* and press "Copy as path"
*Make sure that the folder aims directly at the folder that has the requirements.txt and dump_keys.py in it.
It should look something like this:
Save and exit the file.
Now finally, make sure your device is running! Then double click on the "run.bat" file. Two commandlines will open up.
With your virtual phone, navigate using chrome to the following site:
The site will ask if it is allowed to play protected videos. Press ALLOW.
Scroll a bit down till you see the video and press play.
You should see some activity in one of the commandlines. That means it has worked! 🎉
To verify that, head into the dumper-main folder and check if you see the "key_dumps" folder:
When heading further into the folders you'll find "private_keys" keep going into that folder till you see these two files:
Unlike the manual method you do not have to change anything.