You are using an out of date browser. It may not display this or other websites correctly.
You should upgrade or use an alternative browser.
You should upgrade or use an alternative browser.
Discussion VR Porn
- Thread starter fllout4
- Start date
-
- Tags
- virtual reality vr porn
- Dec 3, 2022
- 86
- 4,293
Some users back in the old thread were asking on how to convert VR 3D video to regular 2D, to which I answered; DON'T. It takes too much time and crops too many pixels. Try this instead:
- First make sure you have a video player that supports 360° playback installed. What this means is that with said player you should have the ability to control the viewing direction of the video in real time (Eporner VR is a good example of this). VLC media player is your best bet here imo. It's available on almost every platform (windows, mac, android, linux, etc.), it's safe and it's free.
- Mind you, even with supporting media player, your video will still look like this.

That's because the player still recognizes it as a regular video. You'll need to put certain metadata into the video file to "tell" the player that this is a 360° video.
- To do so, you can use this app called Spatial Media Metadata Injector. Open the link then under "Assests" click on 360.Video.Metadata.Tool.win.zip (or 360.Video.Metadata.Tool.mac.zip if you're on mac) to download.
- Open the zip file then open the .exe. It should look like this.

- Click open and choose the file you want to inject.
- Make sure to check the "My video is spherical (360)" and un-check the other 2.

Click inject metadata and choose where you want to put the injected video file (by default it'll save the file in the same directory as the source file and add "_injected" at the end of the filename).
- Click save and then wait until it says "Successfully saved file to..."
- The video should now look like this. You can hold the left-mouse button (or use the arrow keys) to adjust viewing angle. The scroll button (and the page up/down keys) can be used for zooming in/out.

- Hope that helps :)
- Jun 24, 2023
- 299
- 4,565
Likewise I'll write up something tomorrow about how to downscale for personal use, IE if you have an older headset or limited streaming ability. I haven't had to downscale anything since I got my quest 3, but when I used my rift s, literally anything over 5k res was like watching a slideshow
I've upgraded my NAS for three 20TB drives in parity. I have 36TB of space for homework. I actually got more, I have 4x3TB drives, but I got some bad sectors on one that I'm going to ewaste once I've moved everything over.
And I had to upload some 15TB to mega so I had enough space (I was using one of the 20TBs by itself) to remake the parity. Buuuut that's going to take ages to download again, that is what the midnight oil is for.
Am musing on if I should share the mega link to my archive there. It isn't my complete archive (it's about half), and I don't care if I get B& there (once I've DLd my stuff), but I've seen far too many bulk leaked megas get shut down..
- Jun 24, 2023
- 299
- 4,565
GUIDE: How to unpack multi-part archives (rar or 7z)
Because bunkr and cyberfile do not allow large uploads, anything large that is being shared needs to either be uploaded individually, or packed into a multi part archive to download.
0. Download 7zip. Don't do this as part of this guide, do this because 7zip is the superior way to zip and unzip crap.
1. Download all the files you from bunkr, gofile, or cyberfile. If you are downloading them from gofile or cyberfile, skip to step #4
YOU NEED TO DOWNLOAD ALL THE PARTS OF A MULTI-PART ARCHIVE TO UNZIP IT!
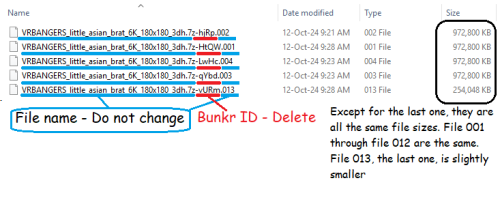
2. You should now have a bunch of files. In this example, the archive I have is 13 parts in total, but I am only showing you 5 of them. The last part is always going to be smaller than everything else. Everything else should have the exact same file size. If it does not, then you can not extract anything.
If you downloaded these from bunkr, they will have a 4 character ID added to the end of it.

3. Delete the bunkr ID. Your file names should all end with filename.7z.001-013

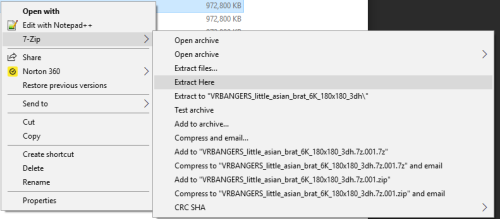
4. Right click the file ending in 001, and extract it. 7zip will give you an error if you are missing any parts.

Again, the FILE NAME needs to be EXACTLY THE SAME, except for the number at the end. You do not need to rename anything if you download them from gofile or cyberfile, only bunkr adds an ID at the end.
Because bunkr and cyberfile do not allow large uploads, anything large that is being shared needs to either be uploaded individually, or packed into a multi part archive to download.
0. Download 7zip. Don't do this as part of this guide, do this because 7zip is the superior way to zip and unzip crap.
1. Download all the files you from bunkr, gofile, or cyberfile. If you are downloading them from gofile or cyberfile, skip to step #4
YOU NEED TO DOWNLOAD ALL THE PARTS OF A MULTI-PART ARCHIVE TO UNZIP IT!
2. You should now have a bunch of files. In this example, the archive I have is 13 parts in total, but I am only showing you 5 of them. The last part is always going to be smaller than everything else. Everything else should have the exact same file size. If it does not, then you can not extract anything.
If you downloaded these from bunkr, they will have a 4 character ID added to the end of it.

3. Delete the bunkr ID. Your file names should all end with filename.7z.001-013

4. Right click the file ending in 001, and extract it. 7zip will give you an error if you are missing any parts.

Again, the FILE NAME needs to be EXACTLY THE SAME, except for the number at the end. You do not need to rename anything if you download them from gofile or cyberfile, only bunkr adds an ID at the end.
- Jun 24, 2023
- 299
- 4,565
GUIDE: How to downscale VR videos for personal use on an older headset that can not play videos larger than 4k, 6k, 8k, etc
Forum rules forbid reposting downscaled, compressed, or lower quality content if it has previously been shared in higher quality. This guide is for YOU, to download big chonker videos to watch on your headset, but your headset is to poo to play it back smoothly, either because you have poor network, or your headset is just too old to play 8k videos.
Doing this will take a lot of time and energy depending on your CPU. But this is for your personal use. If you want to spend your compute for a day or two to look at high quality tiddy, more power to you. But don't share your downscaled version please!
0. Have an idea of the maximum resolution that your headset can playback without issues. For my Rift S, I had no issues with videos no larger than 3840x2160, but YMMV. I will go into detail on to how to find your best size.
1. Download handbreak. You can likely do this with other software, but if you know which software can do that, you shouldn't be needing this guide! https://handbrake.fr/downloads.php
2. Open the app and close out the source selection/drop a file here menu
3. Go to Presets -> Edit Preset
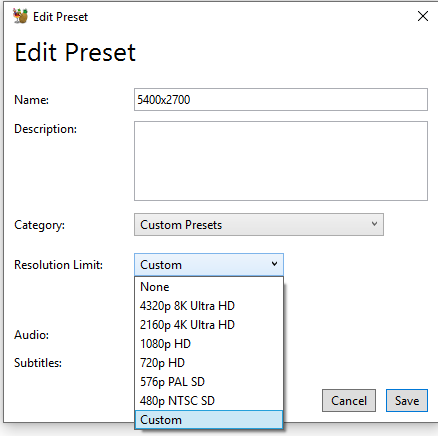
4. If you know your headset's max resolution, either select one of the preset resolution presets for 8k or 2k, or enter custom resolution

5. You can work backwards, if you have a 6k video that doesn't play, set the resolution limit to 2160p 4k.
6. Leave audio and subtitles alone.
7. Drag your video of choice into handbreak, which will load it. This can take some time.
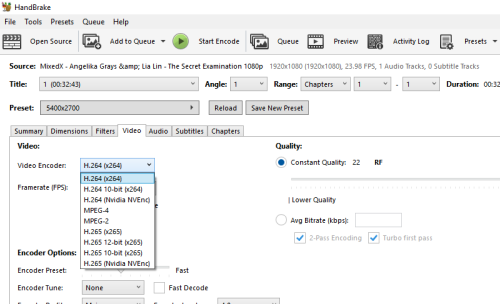
8. Click on Video. You should be OK to leave the encoder alone, but if you have a nvidia gpu, it is worth to try to render with one of the NVEnc encoders. It can be faster. It can also be slower.

9. Click the Dimensions tab. Ensure that the max size is the max size that will work on your headset.
10. Click start encode, and wait!
----
For finding what resolution limit and encoder is best for you, you don't need to wait for the whole video to render.
Wait about 5 minutes. You should see the output file grow in size. If you aren't seeing it get larger, then abort, your encoder likely isn't working. Pick another and try again.
Once you have about 30 seconds worth of video rendered, you can cancel the job, and test the video. If the short video still plays choppy on your headset, you can progressively step down the resolution limit until it plays back smooth, then re-start the render.
A few points
- Contrary to what others have said about encoding videos, unless you're on a laptop (which you shouldn't do this on), you shouldn't have to worry about thermals. Unless your room is already 30C, your CPU is smart enough to thermal throttle.
- Although it can be done, it is advised that your destination DISK is not the same as your source disk.
If there are any questions, feel free to reach out and I'll help out as best I can. This guide is the utmost basic and I had written this in a way that assumes come computer literacy. I can not help you if you aren't able to download or install the program, or if you aren't able to figure out how to set the destination location, or save the preset as your default primary preset. Check handbreak's documentation for that kind of stuff
Forum rules forbid reposting downscaled, compressed, or lower quality content if it has previously been shared in higher quality. This guide is for YOU, to download big chonker videos to watch on your headset, but your headset is to poo to play it back smoothly, either because you have poor network, or your headset is just too old to play 8k videos.
Doing this will take a lot of time and energy depending on your CPU. But this is for your personal use. If you want to spend your compute for a day or two to look at high quality tiddy, more power to you. But don't share your downscaled version please!
0. Have an idea of the maximum resolution that your headset can playback without issues. For my Rift S, I had no issues with videos no larger than 3840x2160, but YMMV. I will go into detail on to how to find your best size.
1. Download handbreak. You can likely do this with other software, but if you know which software can do that, you shouldn't be needing this guide! https://handbrake.fr/downloads.php
2. Open the app and close out the source selection/drop a file here menu
3. Go to Presets -> Edit Preset
4. If you know your headset's max resolution, either select one of the preset resolution presets for 8k or 2k, or enter custom resolution

5. You can work backwards, if you have a 6k video that doesn't play, set the resolution limit to 2160p 4k.
6. Leave audio and subtitles alone.
7. Drag your video of choice into handbreak, which will load it. This can take some time.
8. Click on Video. You should be OK to leave the encoder alone, but if you have a nvidia gpu, it is worth to try to render with one of the NVEnc encoders. It can be faster. It can also be slower.

9. Click the Dimensions tab. Ensure that the max size is the max size that will work on your headset.
10. Click start encode, and wait!
----
For finding what resolution limit and encoder is best for you, you don't need to wait for the whole video to render.
Wait about 5 minutes. You should see the output file grow in size. If you aren't seeing it get larger, then abort, your encoder likely isn't working. Pick another and try again.
Once you have about 30 seconds worth of video rendered, you can cancel the job, and test the video. If the short video still plays choppy on your headset, you can progressively step down the resolution limit until it plays back smooth, then re-start the render.
A few points
- Contrary to what others have said about encoding videos, unless you're on a laptop (which you shouldn't do this on), you shouldn't have to worry about thermals. Unless your room is already 30C, your CPU is smart enough to thermal throttle.
- Although it can be done, it is advised that your destination DISK is not the same as your source disk.
If there are any questions, feel free to reach out and I'll help out as best I can. This guide is the utmost basic and I had written this in a way that assumes come computer literacy. I can not help you if you aren't able to download or install the program, or if you aren't able to figure out how to set the destination location, or save the preset as your default primary preset. Check handbreak's documentation for that kind of stuff
2s960bhqhushdx520u
Lurker
- Oct 27, 2024
- 0
- 0
Is there any way to watch gofile VR videos without downloading? I couldn't get it to work on here sphere or deovr
- Jun 24, 2023
- 299
- 4,565
Likely not. Streaming uses up a whole lot of bandwidth. Gofile isn't a streaming platform, though they offer it. Not surprising that it doesn't workIs there any way to watch gofile VR videos without downloading? I couldn't get it to work on here sphere or deovr
- Dec 3, 2022
- 86
- 4,293
Allow me to add a few points
If the short video still plays choppy on your headset, you can progressively step down the resolution limit until it plays back smooth, then re-start the render.
- If you're after a smooth playback, make sure you're encoding in h264 instead of h265 before you drop the resolution. Most source quality VR videos are encoded in h265 for better quality/size efficiency but it causes the need of higher processing power for playback. With h264 your video might either drop in quality by half or double its size compared to h265, but it'll be easier to run. If it's still choppy then you can start dropping the resolution.
Also mind you, some h264 encoders are limited to 4K resolution (4096x2048p for videos with 2:1 aspect ratio like VR).
but if you have a nvidia gpu, it is worth to try to render with one of the NVEnc encoders. It can be faster. It can also be slower.
- The benefit of GPU encoding is that it's faster (most of the time) and that you can run other CPU based task while rendering the video without noticeable performance hit. The downsize is that the quality of the result won't be as good as the default software encoding.
- Once you find a suitable encoder & resolution, you can also then adjust the quality and file size of your video using the Constant Quality slider on the right side of Handbrake's "Video" tab. Smaller RF number means better quality but bigger output file size. From my experience I found the best trade-off between quality & size to be somewhere around 25-20, while 18-15 gives near-lossless quality with somewhat still acceptable file size. 15-0 basically just adds file size without giving noticeable quality improvement.
One more way that I've been able to utilize Handbrake for VR scenes is when I've downloaded scenes that have been glitchy. I have usually been able to re-encode those scenes with Handbrake using the exact same file specifications as the original and have had the re-encoded version come out perfect.
In order to determine the specs of the original file, I'd recommend using Mediainfo.
https://mediaarea.net/en/MediaInfo
In order to determine the specs of the original file, I'd recommend using Mediainfo.
https://mediaarea.net/en/MediaInfo
- Jun 24, 2023
- 299
- 4,565
Ay, that is a good recommendation. I am pretty sure that handbreak is able to show you that same info, but I can't recall where. I think in the console/log.One more way that I've been able to utilize Handbrake for VR scenes is when I've downloaded scenes that have been glitchy. I have usually been able to re-encode those scenes with Handbrake using the exact same file specifications as the original and have had the re-encoded version come out perfect.
In order to determine the specs of the original file, I'd recommend using Mediainfo.
https://mediaarea.net/en/MediaInfo
